Well, no, it isn't quite that simple — in fact, it is quite complex, for reasons including:
- The physics of light
- The physiology of human vision
- The psychology of color
- How cameras sense light in general
- How cameras sense color difference
- Technical trade-offs in camera design
- The efficiency of image data storage and computer processing of images
- The industry standards that guide camera manufacturers
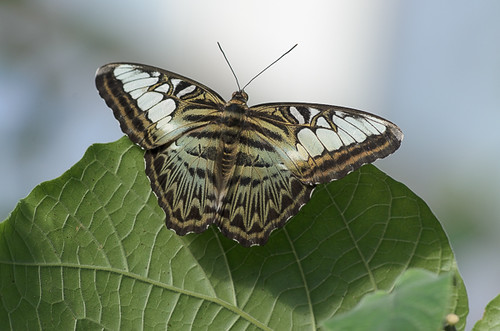
The colors look plausible, we can see lots of highlight and shadow detail, and it is fairly crisp. But this is not how the camera records the image. What the camera records is rather something more like this:
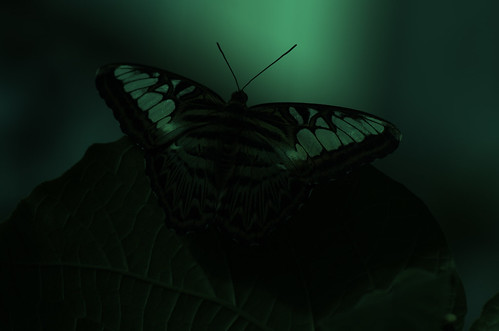
This is dark and green. Not at all what we would expect, based on the naïve idea which opened this article. If we were to open this image into Photoshop, adjust the brightness, and subtract out the green color, we still would not have good colors — they would rather be somewhat subdued and have the wrong hue — and the image would still appear to be a bit lackluster and soft. There would also be severe banding or posterization in the shadows — but that is a matter for later. However, an image file such as this will give you a good idea of the performance, characteristics, and the limits of your camera.
The purpose of this proposed series of articles is to cover the basic steps that go on within cameras and raw processing software, and to do so, we are going to use some software that will emulate, at least partly, what happens in raw conversion, and I hope will explain it in an easy-to-understand fashion.
Now this is entirely for educational purposes — what I present here is no substitute for actually using a raw processor — but I hope that my readers will find this interesting to know, and maybe learn a few things which might make them better photographers and retouchers.
What we need for our experimentation is some computer software that will deliver the closest possible approximation of a camera’s raw data, which we can pull into Photoshop or some other image editing program for further investigation. I use Raw Photo Processor — a free download — but this, unfortunately, is only for Macintosh computers, but the dcraw program can be used with most any computer.
If you have a Mac, download RPP from http://www.raw-photo-processor.com. There are a few settings in Raw Photo Processor needed to produce a raw-like image:

If your imaging editor allows you to use a full 32-bit workflow, then you can set RPP to use Raw RGB TIFF 32-bit, which will give you better accuracy and less clipping. Photoshop has limited 32 functionality, but ought to be able to do most of the functions we plan to demonstrate.
An alternative is dcraw, a simple command-line program, by author Dave Coffin, whose mission is to “Write and maintain an ANSI C program that decodes any raw image from any digital camera on any computer running any operating system” and this software is used in many raw converter packages. You can download the software from http://www.cybercom.net/~dcoffin/dcraw, and a good tutorial for using it is found here.
This program operates off of the command line, rather than the more common graphical interface. The command to produce a lightly-processed raw-like image file is this:
dcraw -v -T -4 -o 0 198_0011.nef
where you replace 198_0011.nef with the name of the raw file you want to process. This software will generate a TIFF file in the form 198_0011.tiff. See the dcraw documentation for the usage of the utility and its parameters. This command creates a 16 TIFF file equivalent to what is generated by Raw Photo Processor.
I will demonstrate processing on Photoshop, although equivalent functionality for our purposes is available in other software applications.
You might want to experiment with RPP or dcraw, in order to get a good idea of what kind of image data your camera actually delivers. Here are some things you might want to look at and try:
- When you attempt to open the image in your image editing software, do you get a warning that your image does not have a profile? If so, assign it sRGB; if not, your software may not be color managed or it may automatically assign the standard sRGB color space — but this is a topic for a later article.
- What is the overall tonality of the image? How much highlight detail do you have, compared to mid tones and shadows?
- Do you have a full range of tones from white to black, or are there dominant bright colors? Are the darkest tones black or a noticeably gray color?
- Take a photo of a scene taken under dim incandescent lighting, and another taken outdoors in the shade, and compare the overall ‘look’ of the images. Try taking photos of the same object under different lighting.
- Try taking photos of the same scene at both high and low ISO. Compare the output.
- Play with Levels and Curves, and see if you can get a good white balance. How much adjustment is needed, and where? Try the automatic correction tools such as Photoshop’s Auto Tone or Auto Color.
- How is the saturation of the image? If you do increase saturation, how good are the resulting colors?
- Try applying a curve to brighten the image, or use some other technique to brighten the shadows. How well does this correct the tonality of the image? How does this change the detail found in the highlights?
- How much noise is in the highlights compared to the shadows?
One critical step in raw processing for most (but not all) digital cameras, demosaicing, will be considered in the next article in this series:
Cook Your Own Raw Files, Part 2: Some Notes on the Sensor and Demosaicing
Cook Your Own Raw Files, Part 2: Some Notes on the Sensor and Demosaicing