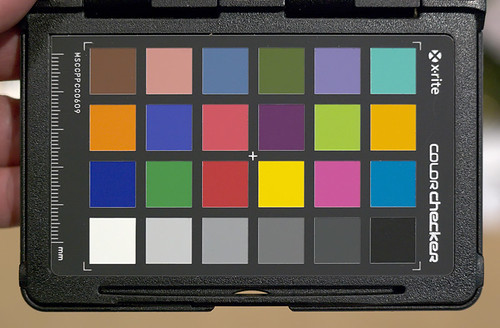
Here is the familiar X-Rite ColorChecker, a handy color calibration target, which despite undergoing many name changes over the years, is well-supported by the photography industry. I took this as a RAW image, and processed it in Adobe Camera RAW (ACR) using a custom profile generated from this image. The colors look pretty good. I adjusted the exposure and black point a bit in ACR, so that the darkest and lightest neutral patches have their correct luminance value. I took this image under incandescent lighting, with an estimated color temperature of 2900 Kelvin; the camera measured the white balance from this card, and it looks quite accurate.
Human color vision is poorly understood, being subject to many conflicting theories, but this is understandable since biology is inherently messy. Ultimately we are subject to one of the greatest puzzles in philosophy: “Know Thyself”, which is found in Plato and other Classical literature. As knowledge of a thing is not a part of the thing itself, self-knowledge is problematical at best. But even if we plead ignorance about our own vision, we do have certain knowledge that digital cameras do not model human vision very well.
Digital cameras are made to be inexpensive and easy to mass-produce, and produce images that conform to widely-supported industry standards. These are not designed by biologists, psychologists, or philosophers, but rather by electrical engineers who follow the practices and principles of their profession. This is as it ought to be, but we also ought to expect that cameras won't record things precisely as we remember seeing them.

This illustration is originally from Wikipedia and is not my own work. Click here for source and attribution.
This is an illustration of the Bayer Array, the most common method of distributing light sensors on a silicon chip. Individual sensels, specifically sensitive to red, green, and blue light, are systematically arrayed across the silicon chip. Dedicated computer algorithms, found in the cameras' embedded computer, analyze adjoining sensels to estimate the color and intensity of light that falls on each spot. All of these taken together comprise the final image — after some additional processing.
Note that there are twice as many green sensors than either red or blue sensors. More sensors mean better detail and less noise in that channel. This is justified by the fact that human vision is most sensitive in the green region. Generally speaking, the green channel typically has the most natural looking luminance, while the red channel tends to be too light and the blue too dark. After all, luminance is more important than color.
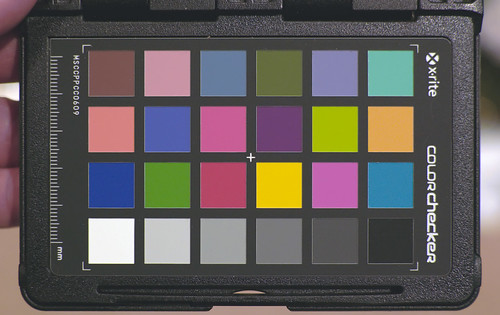
Let's take another look at the image above, but showing it more as the camera actually recorded it:

I processed this using the excellent free Macintosh software package, RAW Photo Processor. I developed this RAW image to closely represent what was actually recorded by the camera. Here I used UniWB as the white balance, which give us the colors as actually recorded without adjusting for the color of the light.
Because half of the camera's sensors record green light, this image has a green color cast, and since this photo was taken under incandescent lighting (which is more yellow and less blue than daylight), it also has a yellowish color cast. Either the camera's computer, or Adobe Camera RAW as in the top photo, will adjust the RAW image so that we get roughly equal red, green, and blue values on each of the neutral patches seen on the bottom row of the X-Rite calibration target.
The image is also quite dark compared to the corrected version. This is because the camera is linearly sensitive to light, and can only faithfully capture a rather limited range of light levels in one exposure, unlike the human eye. Typically, a digital camera will apply a Gamma correction to the raw sensor data to generate the final image, giving us plausible mid-tones. In RAW Photo Processor, I used a Gamma value of 1, which does no correction: digital cameras usually use a Gamma value of 2.2, and accordingly this is the default setting of the program.
So the camera does a lot of processing behind the scenes to generate our final image. I loaded the greenish image into Photoshop to see what kind of curves are needed to produce the corrected image. I adjusted the Photoshop curves so that the adjusted values of the neutral patches roughly matched the published values for this target. This is what I got:
The neutral targets look fine, but the colors are a bit off, especially red tones; obviously there is additional image processing going on: see the article Examples of Color Mixing.
Here are my curves for this image in Photoshop:
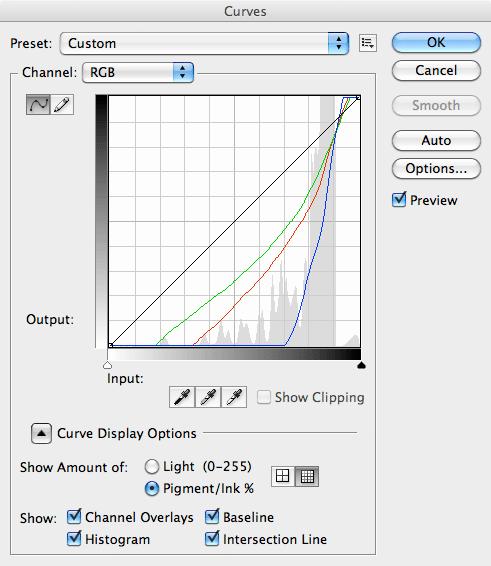
My oh my, there is a lot of adjustment going on in this image. The diagonal line on the graph indicates the line of no adjustment; whatever is below the line has been brightened, and whatever is above the line is darkened. The steeper the line, the more adjustment. We can deduce a few things from this graph:
- The photo was a bit underexposed, since all the color channels needed to be brightened.
- The blue channel is severely deficient, and needed a very steep curve.
- Incandescent lighting tends towards the red color. If we didn't have two green sensels for each red one, the red channel would have been brighter than the green channel.
- Getting good white balance does not guarantee that colors are correct.
We ought to be worried about the steepness of the lines. Increased contrast — that is, steep curves — means increased noise. Brightening is a form of amplification, and amplification necessarily increases noise. For this reason, I recommend using Photoshop in 16 bit mode when applying severe curves to images, and also using RAW instead of JPEG images if much processing is foreseen, for both of these methods retain more information about the image.
However, this also illustrates that severe curves are applied to the raw sensor data within the camera itself, which increases noise. Now, this image came from a Nikon D40, which is known for having low noise — even at ISO 1600 as was used here — and I did perform slight noise reduction over the image. However, under more extreme conditions, like dim low-wattage bulbs, or with an inexpensive compact camera, we can expect lots of noise in the blue channel under incandescent lighting.
For critical work, this problem is lessened by using low ISO, shooting in RAW, using a tripod, and blending together multiple exposures so as to get an excellent blue channel. Or alternatively, use lots of high quality supplemental light, such as from strobes.
I am of divided opinion as to effectiveness of the Bayer array. It does not appear to provide optimal performance under the any of the most common lighting conditions, nor does it appear to be an optimal compromise offering good average performance. I tend to think that blue light, under almost all conditions, is under-measured by this kind of sensor. I may be wrong because illuminance — which is primarily measured by green light — is more important than color, and so perhaps a camera sensor deserves to have more green sensors. I just don't know. The Bayer array has the advantage of being compact, as it has a repeating 2x2 pattern, which is more compact than every other proposed array and so will have the greatest color accuracy for each final pixel of the image. However, we ought to consider the Foveon sensor, which records full color at every sensel, and so does not display any demosaicing errors as found with the Bayer array and its rivals.
In dim lighting, human vision becomes even more sensitive to blue light, and so diverges greatly from what is seen by the camera, but that is a problem best considered in another post.
5 comments:
Mike,
Blogger is not letting me publish your comment:
"Good explanation. To make matters even worse, there is quantum efficiency to contend with. The CCD chip itself is way more sensitive to red and green than it is to blue. So even in something like the Foveon chip the blue channel wold be noisier. "
Mark,
Can you share a link to the RAW or jpg image you use to shoot UniWB on your Nikon D40?
I am interested in trying this out.
Thanks!
-Ed
Ed,
You can use any RAW file and process as UniWB. You need to download a copy of RAW Photo Processor at http://www.raw-photo-processor.com -- unfortunately it is Mac only. Then do these settings:
- White balance UniWB
- Gamma 1.0
- Set profile to RAW RGB TIFF 16 bit
This will give you a close approximation to the actual signals recorded by the camera, without processing.
Hope you have fun with it!
Mark,
Thanks for your reply, I'm still a little confused. I got RPP and got it running.
What I wanted to get was a jpg that I can put on my D40 and use as a reference custom white balance for the camera.
My understanding is that with this UniWB set, when shooting RAW, the histogram on my camera would be more accurate with respect to actual clipping when shooting RAW.
Have you tried something like this, and if so, do you still have that file that you load into your D40?
Thanks,
-Ed
Ed,
Sorry, I misunderstood you!
I have heard of a technique for doing this sort of thing; tried it, but didn't work with my camera.
There appears to be a lot of people however, who are getting good results. Search Google for UniWB. There are lots of examples.
Post a Comment