Well, he looks into your cubical precisely at midnight every day. Despite graduating with honors in a top M.B.A. program, he really isn't all that bright, and he lacks a life outside of work. As a matter of fact, you do work 8 a.m. to 5 p.m. (with an hour for lunch), Monday through Friday, and you are always at your cubical during those times. But boss marks you down as being absent 100% of the time.
Well, since you actually do your required work, bossman decides to check up on you four times a day. Quite methodically, he appears at your cubical at midnight, 6 a.m., noon, and 6 p.m. As it so happens, you take your lunch at noon, and he just barely misses seeing you every time. You are still absent 100% of the time, in his mind.
Boss is still puzzled. With apparently too much time on his hands, he checks on you eight times a day. Midnight, 3 a.m, 6 a.m, 9 a.m., noon, 3 p.m., 6 p.m., and 9 p.m. He finally sees you! Since he sees you 2 out of the 8 visits he makes, Monday through Friday, he estimates that you are working at most 2/8 x 24 x 5 = 30 hours per week. He is disappointed, but at least you get to keep your job.
Note that if he visited your cubical three times a day, at midnight, 8 a.m., and 4 p.m., he'd see you twice (the first time just as you got there) and would estimate a working time of 2/3 x 24 x 5 = up to 80 hours per week. But four times per day gives zero. Clearly the frequency of his visits can change the results dramatically.
Your boss's boss likes what he is doing, and asks that he get more data so that he can present an impressive chart at an upcoming meeting. Your boss now checks your cubical 12 times a day. He visits at midnight, 2 a.m., 4 a.m., 6 a.m., 8 a.m., 10 a.m., noon, 2 p.m., 4 p.m., 6 p.m., 8 p.m., and 10 p.m. He sees you working 4 times per day, Monday through Friday, and so he estimates that you work up to 40 hours per week. If he visited your cubical 24 times a day, or 48 times a day or more, he may (hopefully) notice that his increasing visits didn't give him much more useful data: he would always get a result close to 40 hours per week.
Slightly different
Let's consider a slightly different scenario. Your boss is always on top of the latest scientific theories. He read that the natural sleep-and-wake rhythm of human beings, when not exposed to the cycle of the sun, is 25 hours a day. Always ready to implement these newest findings, and since he apparently never sees any sunlight, your boss now lives out a 25 hour day, although who knows when he actually gets any sleep. Instead of checking your cubical once a day, he checks it once every 25 hours. If he sees you at your desk, he gives you credit for the entire 24 hour day (unfortunately, he has yet to convince his boss to move all the employees to this new scientific schedule). So the first day, he checks for you at midnight, the second day at 1 a.m., the third at 2 a.m., and so forth.
Although he finds you working sometimes four days in a row, he is infuriated that you are (apparently) taking two week (and longer!) vacations at regular intervals. He does estimate that in the long run you are actually working on average 40 hours per week, but he is worried about all the important conference calls you must be missing.
No Common sense
This hypothetical boss, despite being diligent, lacks common sense. This lack of common sense, while being reprehensible in a human being, is quite the norm with digital cameras and with computer software such as Photoshop, although we must credit computer technology with also being diligent. It's hard — no, impossible — to program a computer with common sense, and so we ourselves must make up for what computers lack if we want good results.
Better yet worse
I was delighted when I upgraded from a nice but lowly point-and-shoot camera to a decent, yet inexpensive, DSLR model. Immediately I noticed how sharp my new photos were, as well as having much less noise, even in low light. But there was a problem, and I couldn't quite put my finger on it. With my old camera, when I was processing images for the Internet, I would simply resize them and add sharpening. Even though there were various re-sizing algorithms available in Photoshop, none seemed to make much of a difference. I did put a lot of effort into using good sharpening algorithms, which made my photos look much crisper without obvious artifacts. But this did not work well with my new camera.
My old process did not work all of the time with my new camera — and the maddening thing was that my results were quite inconsistent — some of my final images looked fine, some were terrible (nature photos were typically the worst). Formerly, when I reduced the size of my images, I had Photoshop set to use the Bicubic Sharper algorithm, which Photoshop says is “best for reduction”, but I found that the new camera's images looked quite rough. So I changed it to use regular Bicubic. This required quite a bit more sharpening than I had used before, and I started using better algorithms that would reduce the bright artifacts I was now seeing, especially around distant leaves on trees and along certain edges. Sometimes I had to manually retouch out some of the sharpness. To me, this is not acceptable, so I started asking around for advice. As it turns out, Photoshop gets it wrong, and does not implement its resizing algorithms correctly.
Hit a brick wall
Digital cameras have ranks and files of pixels, arrayed across their sensor, in precise order, just like the smart-yet-foolish boss in our allegory above. Precisely every x micrometers, a different sensor captures light, just like precisely every y hours the boss would check up on his subordinate.
In the story, you arrive at work at a regular interval, but your nosy boss, if he didn't check up on you frequently enough, would get a wildly inaccurate estimate as to when you actually were present. Only when he checked up on you many times in a day did he get an estimate that was accurate enough.
A similar same thing happens in a digital camera. If there is an underlying, repeating pattern in the scene, the camera may get a wrong estimate of what the scene looks like if you have an inadequate number of pixels to capture enough detail. We see this on initial capture. Here is a section of a photograph, showing textured carpet:
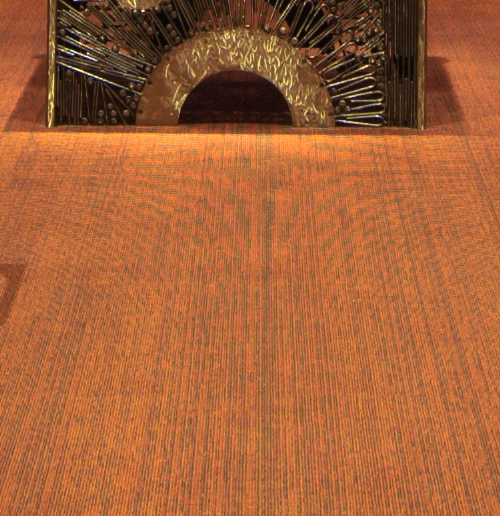
The camera did not have enough resolution to capture the repeating texture of the carpet adequately. So we end up with ugly artifacts, here shown by the odd pattern. There were no curves in the texture of the carpet, but the pixels on the camera, being spaced too far apart, got a strange signal. It was not sampling the texture frequently enough. This pattern is called the Moiré effect or an interference pattern, and is a special case of aliasing.
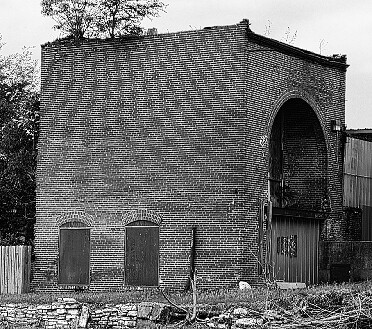
Not only do we see this on initial capture, but this can be a severe problem when we are downsizing an image. Downsizing in business ruins lives, while downsizing in digital photography ruins images. If there is a repeating pattern in an image, we can get bizarre patterns upon downsizing if we end up with fewer pixels than a particular pattern requires. Here is a detail of a larger image:
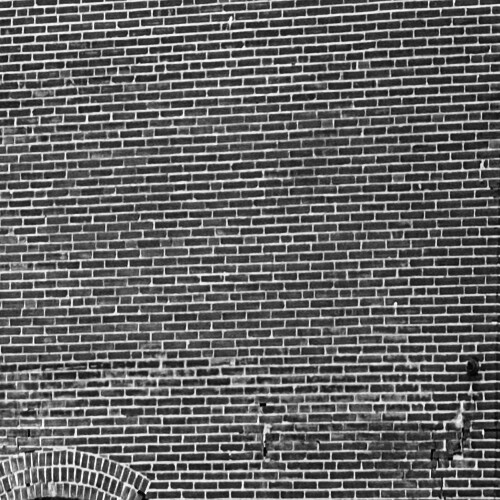
A brick wall. We have a classic, repeating pattern, which will test Photoshop's ability to resize.
First we use Bicubic Sharper, which Photoshop tells us is best for reduction:

Ugh. Bad pattern. Just like the boss who was checking on you at 25 hour intervals (and thinking that you were frequently taking 16 day vacations), we see some bands of the brick wall where the lighter white mortar predominates, and other bands where the dark brick predominates. Also, the rest of the image looks rather rough.
Please note: these sample images are intended to be viewed at 100% resolution. If you are viewing these images on a mobile device, they may be further resized by your device, not giving you an accurate representation.
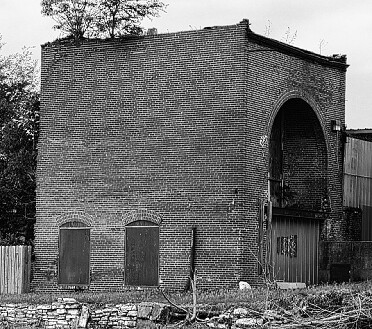
Now let's try Bicubic:

The repeating pattern is still there, but the rest of the image looks a bit better, if soft. Now normally I'd add sharpening to an image like this, but the pattern on the bricks just looks unprofessional.
Bicubic Softer does not help:

Now lately I've been using the Bilinear algorithm for resizing. The final images, to my eyes, look crisper than Bicubic, yet less rough compared to Bicubic Sharper. Let's try Bilinear on the brick wall:
Interesting. The pattern changed, and maybe it is somewhat less obvious. But still bad. I do like how the rest of the image turned out though: it would hardly need any sharpening at all.
For the sake of completeness, let's try the Nearest Neighbor resizing. As Photoshop says it is best when we want to ‘preserve hard edges’, and since the building has hard edges which we want to preserve, it should look fine, right?
Nope. Blech. Looks like a zebra.
Note that the big problem we are seeing is due to the regular pattern of the subject, such as the brick wall, coupled with the regular pattern of pixels on the digital image. We do not see moiré patterns with film cameras and prints: the chemical film grains are irregular shapes and sizes.
But fortunately there is a good general theory to help us out. The Nyquist sampling theorem states:
If a function x(t) contains no frequencies equal to or higher than B hertz, it is completely determined by giving its ordinates at a series of points spaced 1/(2B) seconds apart.Very roughly speaking, if we take a picture of something that has a regular pattern, if we don't allocate more than two pixels for a repeating element, then we will get the moiré pattern. But actually it is slightly more complicated than that, since we have three colors of pixels, at slightly different locations on our sensor. In the photo of the carpet above, there is much more moiré in the red and blue channels compared to green, as we do have twice as many green sensors.
There are also other mathematical effects involved to complicate matters, such as the Nyquist theorem assumes the frequencies are perfect sine waves. A pattern with hard edges, such as the bricks, actually are equivalent to somewhat higher sine wave frequencies. So some authorities state that for hard-edged repeating patterns such as these bricks, and with a Bayer Array (where we have separate photo-sites for each color channel), we ought to capture at least three (or maybe up to four) pixels per repeating pattern element to avoid aliasing.
We find the exact same thing when downsizing an image. If the final resampled image does not have more than two pixels capturing each element of a repeating texture in the original image, we will get a moiré pattern. Because of the complications given above, maybe we need a little bit more, like 3 or so pixels just to be safe. So if our bricks, about 10 pixels apart vertically on the original image, are roughly reduced 1/5 or less in size, then they will definitely show a bizarre pattern, since we are allocating two or fewer pixels per brick. This is what we see in the photos above. I didn't get any moiré effect when I downsized the image to either 50% or 33% (5 or 3.3 pixels per brick) — and just started getting moiré at 26%, which is about 2.6 pixels per brick.
This is analogous to what is done in the audio recording industry. Young, healthy human ears can hear frequencies up to about 22 kHz, and audio engineers will sample the audio at more than twice that frequency, 44.1 kHz, to avoid audio artifacts like we see in our aliased images.
Boss tries harder
Your boss still wants to keep track of you, but because he has other duties, he attempts to automate the task. He installs a sensor at your cubical door. Whenever you are in your cubical, the sensor records that fact. At the end of a fixed period of time, the sensor resets itself and sends a signal to your boss's office whether or not you were in your cubical anytime during that period. He sets the sensor to send him data every day at midnight. He successfully finds out that you are in the office every weekday. Under your boss's old system, he knew precisely when you were at your desk at a given moment in time, but the new system, while it is less specific, gives him more useful information. In effect, the sensor blurs the boss's data a bit, but he gets better results. With one sample per day, he gets better results than visiting your cubical four times. Were he to sample the sensor more times per day, he would get a much better idea of your attendance than if he were to visit your cubical the same number of times. Maybe he'll find something better to do with all the time saved.
As it so happens, digital cameras incorporate anti-aliasing filters to combat moiré patterns. This softens the image a bit, but it can lessen the effect that we see in the carpet photo above. Consumer grade compact cameras tend to have heavy anti-alias filters, DSLRs have weaker ones, while medium-format digital camera backs may have none. With the higher-grade cameras, it is up to the photographer to either avoid or correct for these imperfections — although with more pixels, this will be less of a problem.
Blurring is the key
This softening is the key to downsizing images. According to the Nyquist theorem, our samples need to be more than double the frequency of the original signal to avoid artifacts, but when we make an image smaller, we greatly increase the frequency of our patterns. So what we need to do is to blur the image first — before downsizing — so that the Nyquist theorem still holds for our final image. In more technical terms, an image needs to be put through a low-pass filter before being down-sampled — the high-frequency components of the image have to be eliminated first by blurring.
I started getting the ugly artifacts when I reduced the image below 2.6 pixels per brick, and so to eliminate them we need to run the image first through a low-pass filter, which will get rid of any detail 2.6 pixels in size or smaller.
Photoshop does not blur an image prior to downsizing, not even the newest Photoshop CS5. That is why we get these digital artifacts. I would think that this would be fairly easy to implement.
How an image ought to be blurred prior to downsizing is a mathematically complex subject, and certainly the optimal blurring algorithms are not found in Photoshop. But we could experiment with Gaussian Blur, although choosing the Gaussian radius may be a bit problematic.
OK, so we want to be sure that we don't have any frequency components of our bricks being any less than about 2.5 pixels per brick in the final image. I initially choose to apply a Gaussian blur with radius 2.5 before downsizing. This is a quite naïve start, and so I did blurs in various steps:

Radius = 2.5. Just for fun, I used the Nearest Neighbor resizing algorithm, which gave us the horrendous zebra stripes seen above. It doesn't look too bad, does it? I added 50% Photoshop Sharpen to these images to make them look a little better. Better sharpening is called for however.
Here are other Gaussian blur radii:
Radius = 1. We still have severe aliasing.
Radius = 1.5. Still some aliasing.

Radius = 2. Some very faint aliasing; otherwise this is a good image.

Radius = 3. Too soft.
Blurring is the key
This softening is the key to downsizing images. According to the Nyquist theorem, our samples need to be more than double the frequency of the original signal to avoid artifacts, but when we make an image smaller, we greatly increase the frequency of our patterns. So what we need to do is to blur the image first — before downsizing — so that the Nyquist theorem still holds for our final image. In more technical terms, an image needs to be put through a low-pass filter before being down-sampled — the high-frequency components of the image have to be eliminated first by blurring.
I started getting the ugly artifacts when I reduced the image below 2.6 pixels per brick, and so to eliminate them we need to run the image first through a low-pass filter, which will get rid of any detail 2.6 pixels in size or smaller.
Photoshop does not blur an image prior to downsizing, not even the newest Photoshop CS5. That is why we get these digital artifacts. I would think that this would be fairly easy to implement.
How an image ought to be blurred prior to downsizing is a mathematically complex subject, and certainly the optimal blurring algorithms are not found in Photoshop. But we could experiment with Gaussian Blur, although choosing the Gaussian radius may be a bit problematic.
OK, so we want to be sure that we don't have any frequency components of our bricks being any less than about 2.5 pixels per brick in the final image. I initially choose to apply a Gaussian blur with radius 2.5 before downsizing. This is a quite naïve start, and so I did blurs in various steps:
Radius = 2.5. Just for fun, I used the Nearest Neighbor resizing algorithm, which gave us the horrendous zebra stripes seen above. It doesn't look too bad, does it? I added 50% Photoshop Sharpen to these images to make them look a little better. Better sharpening is called for however.
Here are other Gaussian blur radii:
Radius = 1. We still have severe aliasing.
Radius = 1.5. Still some aliasing.
Radius = 2. Some very faint aliasing; otherwise this is a good image.
Radius = 3. Too soft.
Ok, for sure we can get rid of aliasing when it obviously appears on an image like this one. But this may not be optimal, for the final image appears a bit too soft. One trick I've used is to blend together two copies of an image, reduced using different algorithms. In this case, I'd select the anti-aliased part for the bricks, with a normal downsize for the rest of the image.
However, anti-aliasing may help images even without an obvious pattern such as this. I recall that I often get poor resizing results, particularly with distant leaves against the sky, and along certain edges. Perhaps using even a soft blur will help with these images.
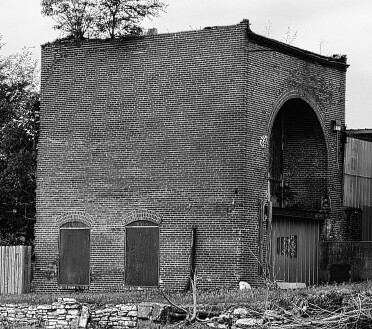
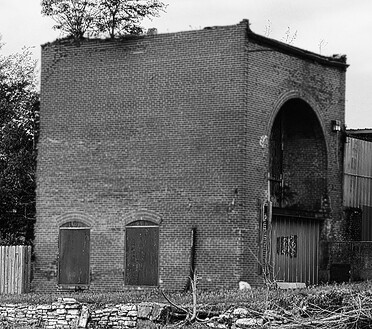
But we really ought to be using better algorithms than Photoshop offers. Very many algorithms are implemented in the free ImageMagick command-line utility, and in-depth discussions are here and here. For downsizing, they recommend the Lanczos algorithm for photographic images. It properly does blurring before reducing, although it does not use the optimal blur algorithm, for the sake of good performance. Using that software, I resized the brick building:

Lanczos still has a bit of moiré, so I'm a bit disappointed. Otherwise it looks pretty good, and is much better than any image found above.
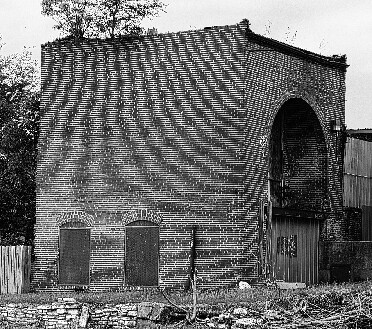
I tweaked the processing a bit and got this:
I blended the above image with a version that I blurred before downsizing. I masked out the building in the unblurred layer, giving us this composite.
Apparently there are some other, better algorithms available, but they are computationally expensive, or difficult to fine-tune optimally. However, whichever resizing algorithm you use, it is important to sharpen the image afterwards to bring back some crispness to the image.
However, anti-aliasing may help images even without an obvious pattern such as this. I recall that I often get poor resizing results, particularly with distant leaves against the sky, and along certain edges. Perhaps using even a soft blur will help with these images.
But we really ought to be using better algorithms than Photoshop offers. Very many algorithms are implemented in the free ImageMagick command-line utility, and in-depth discussions are here and here. For downsizing, they recommend the Lanczos algorithm for photographic images. It properly does blurring before reducing, although it does not use the optimal blur algorithm, for the sake of good performance. Using that software, I resized the brick building:
Lanczos still has a bit of moiré, so I'm a bit disappointed. Otherwise it looks pretty good, and is much better than any image found above.
I tweaked the processing a bit and got this:
I blended the above image with a version that I blurred before downsizing. I masked out the building in the unblurred layer, giving us this composite.
Apparently there are some other, better algorithms available, but they are computationally expensive, or difficult to fine-tune optimally. However, whichever resizing algorithm you use, it is important to sharpen the image afterwards to bring back some crispness to the image.
5 comments:
I'm glad to know it's the camera taking the craptastic images this time and not me.
For a minute I thought you were going to start talking about education and assessment.
Remember a pig don't get fatter the more you weigh it ;)
Have you seen resizing algorithms by seam carving? Not a resampling but a removal of pixels. It would be interesting to see wht it would do with your brick building.
Mike, the latest couple versions of Photoshop have that feature. It looks horrendous. If lots of folks use that feature, I see lots of Photoshop disasters in the making!
Tina,
Does the boss here sound familiar?
Try Resize Magic http://www.fsoft.it/imaging/en/Esempi.htm
Post a Comment