Logically, I am presenting demosaicing as the first step in processing a raw file, but this is not necessarily the best thing to do — I am simply describing it now to get it out of the way.The article is Cook Your Own Raw Files, Part 2: Some Notes on the Sensor and Demosaicing.
By trying to “get it out of the way,” perhaps I wasn't thinking about my readers, who might get something out of attempts to do demosaicing themselves. It is an important process that goes on in the camera, something that needs to be done right. The purpose of this series is to demonstrate the various steps that a digital camera or raw processor might go through in producing an image, for the education of photographers and retouchers. Simply omitting an important step because it is difficult is not helping anyone.
In the first article in the series, Cook Your Own Raw Files, Part 1: Introduction, I mentioned that I use Raw Photo Processor to produce lightly-processed images that can be used to experiment with the kinds of processing that goes on in raw converters. But this is a Macintosh-only application; and so, for users of Windows, Linux, and other computer operating systems I suggested using dcraw, but I hardly knew much about it.
But I recently discovered that dcraw can produce undemosaiced images; while this is in the documentation, I overlooked it. This feature can allow interested persons the ability to easily try out the demosaicing process themselves. You can get your own free copy of dcraw at http://www.cybercom.net/~dcoffin/dcraw/; it is a command-line utility, which makes its use more difficult for those computer users only familiar with typical graphical interfaces, but a bit of effort in trying this out can be worthwhile. The command to convert a file is thus:
dcraw -v -E -T -4 -o 0 DSC_5226.NEF
Where ‘DSC_5226.NEF’ is the camera raw file that you want to convert. You must issue the command in the same directory or folder where the file is located, or otherwise supply a path to the file. The command will output a TIFF file in the same directory: in this instance, dcraw will output DSC_5226.tiff.
The options used have this meaning:
- -v Verbose output — the command will display extra text which might be useful in our further processing.
- -E Image will not be demosaiced; also, pixels along the edges of the sensor, normally cropped by the camera, are retained.
- -T Output an image conforming to the Tagged Image File Format (TIFF) is output. Many common image editors can read these lossless files.
- -4 A 16-bit image is produced instead of the more common 8 bit image files, which gives us more accuracy, without any gamma conversion or white level adjustments. This gives us a dark, linear image.
- -o 0 This is a lower-case letter ‘o’ and a zero. This turns off the adjustment of colors delivered by the camera; this option will deliver uncalibrated and unadjusted color.
These settings will give us an image file which most closely represents the raw data delivered by the camera. Also, I ought to note that a white balance won't be done by dcraw, turning off the mechanism which compensates for the color of the light illumining the scene in the image.
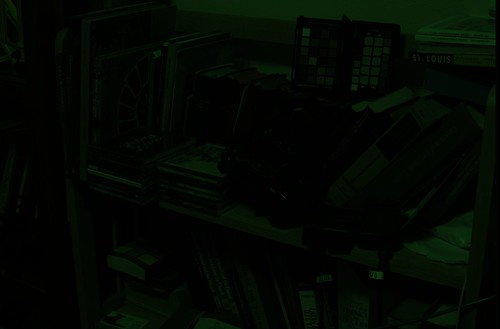
Here is a view of some bookshelves in my office, from approximately the same angle of view that I see from my computer:
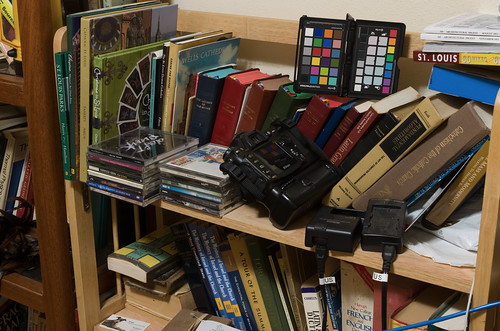
The color and tonality in this photograph on my calibrated monitor look pretty close to what I see in real life — maybe some of the bright yellows are a bit off. Otherwise this is a suitable image taken with reasonably good gear and technique. I will use this image as the sample for our further processing in this article. You can get a copy of this original Nikon raw NEF file here.
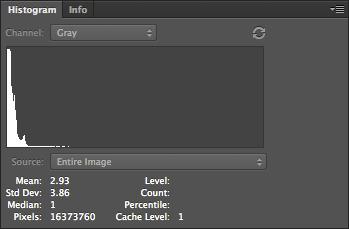
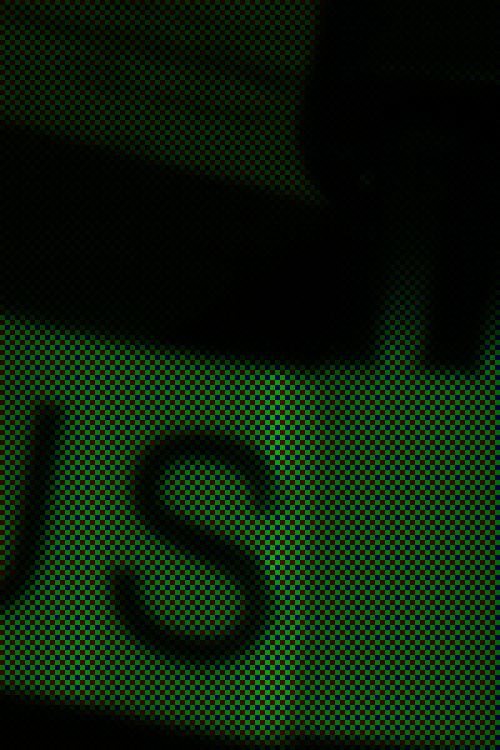
OK, I ran this image through dcraw using the settings shown above, and I get this result:

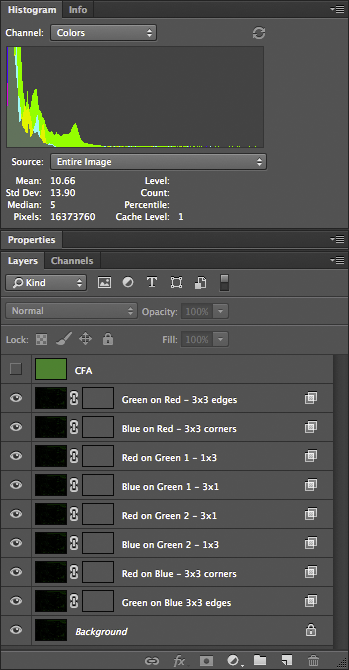
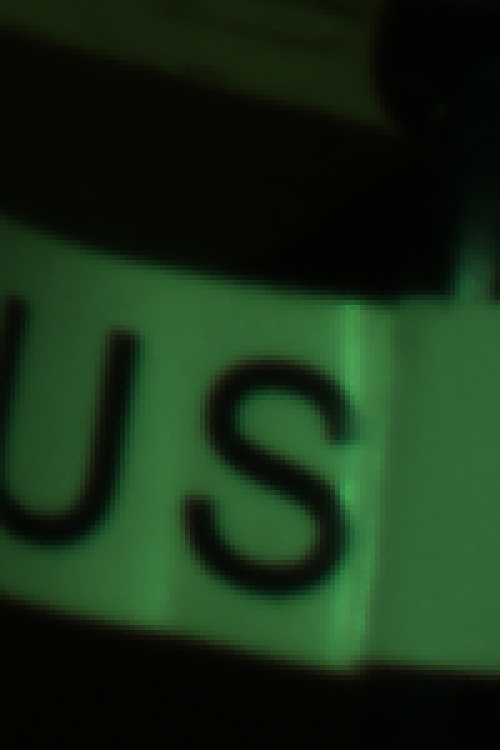
Not much to see here! If we take a closer look at the file:

We can see that it is monochrome, extremely dim, and has the camera's mosaic pattern on it. You can download a copy of this processed file here.
The image is so dark partly because my Nikon delivers 14 bit raw images — while the image format itself is 16 bits, and so we have unused brightness numbers. If you are unfamiliar with bits, you might want to review the Wikipedia article on binary numbers. Basically, the number of bits in this case is a measure of how many levels of brightness is represented in the raw file. If you add one bit of depth to an image, you double the number of levels of brightness:
- If you have a one bit-depth image, you only have two levels of brightness — white and black.
- In a two bit image, you have four levels of brightness — black, dark gray, light gray, and white.
- Three bits gives 8 levels, four bits give 16 levels, five gives 32 and so forth.
- A 14 bit image has 16,384 levels, and a 16 bit image has 65,536 levels.
When we process an image, we need to use all of the 16 bits, because white is defined as the brightest 16 bit number.
Understand that with a linear image such as this, the entire right half of the histogram is brightness levels associated with the 16th bit; and half of what is left is data associated with the 15th bit. So to scale the 14 bits data we have, so as to use all 16 bits, we can chop off the part of the data that isn't used by Nikon — the top three quarters of the histogram. Photoshop's Levels tool only gives us the ability to adjust 256 levels of brightness — 0 is black and 255 is white — even when working with a 16 bit file, but for our purpose this isn't a problem. So the 16th bit takes up the upper half of the data, the top 128 levels, from 128 to 255, while the 15th bit takes up the range from 64 to 127.
So for a 14 bit camera, we need to set levels to 63:
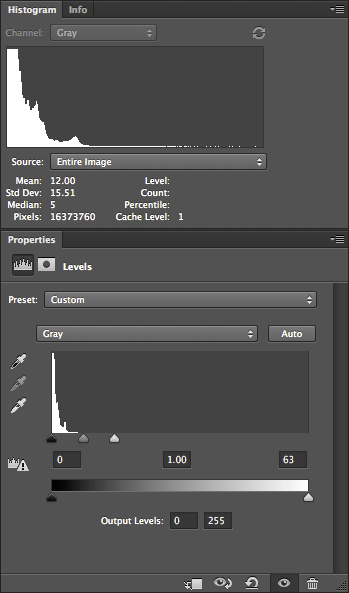
This use of Levels gives us the same results as if we multiplied all of our image numbers by 4.
Notice how the histogram shows that there is some image data going all of the way across — although, for other reasons, often won't quite touch the right hand side. Be aware that linear images tend to have most of their data clustered around the darkest, or lefthand part of the histogram — this is normal. JPEGs delivered by cameras, or images viewed on the Internet, have a gamma correction applied to them, which is a kind of data compression that assigns more color numbers to shadows and mid-tones at the expense of highlights. This actually works out well, but adds mathematical complexity, which I hope to cover later. This will give us a nice, usable histogram where most of the values are typically clustered around the middle instead of way down at the left hand edge.
Many cameras are 12 bit, and so the Levels would have to be set at 15 — which would give us the same results that we would get by multiplying all of the values in the image by 16.
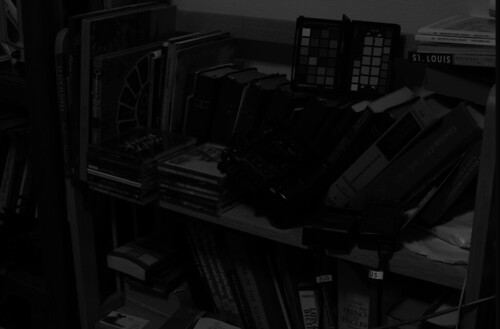
Our image is now brighter and we can actually see the subject tolerably well.
Now Photoshop is hardly the best software to do demosaicing, but it can be done with many cameras. The first thing we need to do is to identify the mosaic pattern used by the camera— there are a wide varieties of patterns used in the industry, but fortunately, there are a few that are commonly used. One major exception is Fuji, which often uses innovative patterns in their cameras. Sigma, which uses Foveon X3 sensors, do not have a pattern, and so this entire discussion on demosaicing is irrelevant.
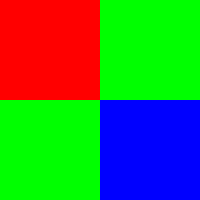
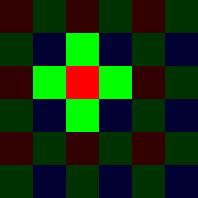
My Nikon camera uses the RGGB pattern, where, starting in the upper-left hand corner of the image, we have a pattern that looks like this:
We have a repeating pattern of 2x2 blocks, with red in the upper left hand corner, and blue in the lower right hand corner.
You will have to look up the pattern used in your camera, or simply use my example files linked above. If you have clever computer programming skills, you might even be able to parse the dcraw.c source code for clues — all of the supported camera patterns are encoded in the file. However, be aware that not all mosaic patterns can be decoded by my method, which assumes the RGGB pattern. However, if your camera pattern is a rotation of this, you might be able to rotate your image to get it to fit — for example, I demosaiced a Panasonic camera raw file, which has a BGGR pattern, simply by rotating the image 180 degrees.
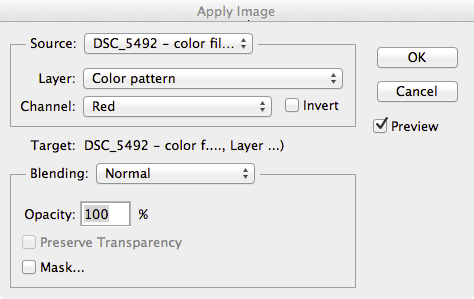
First duplicate the undemosaiced file in Photoshop, and convert it to the standard sRGB IEC61966-2.1 color space. The color space isn't yet important, but it will help you see what is going on in the processing. Now this conversion will mess with the tonality of image, and so I select each of the three color channels separately, and do an Image->Apply Image… command to put the original grayscale values into the new RGB image.
Then I create a 2x2 pixel image which duplicates the array pattern:

You see that little dot, right? That is the 2x2 image. Here is a bigger version:
Then I select the menu Edit, then Define Pattern…, then give it name.
On the new image, I create a new layer, go to Edit, then Fill… and then Use: Pattern, and then select my new Custom Pattern. The new layer will be filled with the repeating mosaic pattern. I turn this layer off so we don't have to see it.
Then I duplicate the image into three layers, which I name red, green, and blue, and put a layer mask on each.
On the red layer mask, I apply the red channel of the color pattern, using Image, Apply Image…:
This gives us only the red bits of the color filter array in this layer. I do the similar action for the other layers. Then, I double click on the layer name in the Layers tab, and this comes up:
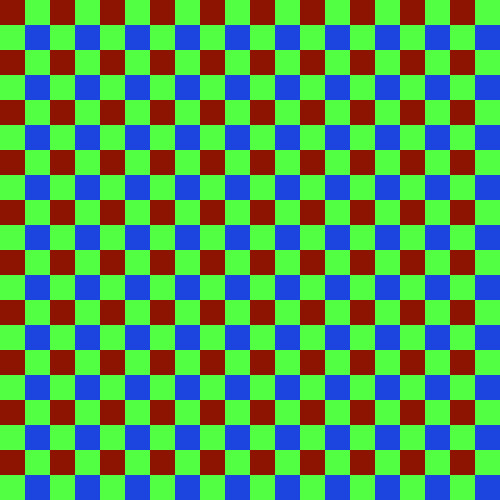
I select only the R channel, unchecking G and B; this turns the layer into the red color, and then I do the same for the blue and green layers, selecting only the corresponding channel to the layer. When I fill the bottom original layer with black, this results:
It appears to be a full-color image, albeit with a very bad white balance; but if we examine a small part of it:
We can see the color filter array on the image. You can download the full color mosaic image here.
The demosaicing procedure I will show here is completely ad hoc, but at least it might give Photoshop owners some of the flavor of the process. You might want to review the article Cook Your Own Raw Files, Part 2: Some Notes on the Sensor and Demosaicing for an overview of the process.
The basic problem is this — at any given pixel location, we only have one color, and we have to estimate the other two colors, based on the colors found in surrounding pixels. So for each type of pixel in our color array, we need need two functions to get the color, which for our 2x2 matrix, gives us 8 functions. For this exercise, I'll use a bilinear function, which is pretty good although still being simple.
Following is an illustration of bilinear demosaicing functions, which takes averages of all the adjacent surrounding pixel values to estimate full-color at each pixel.
In order to do demosaicing in Photoshop, we can use the obscure Custom filter, found in the menus under Filter->Other->Custom…
We will have to use four custom filters for this task, corresponding to the four types of patterns seen in the above animation:
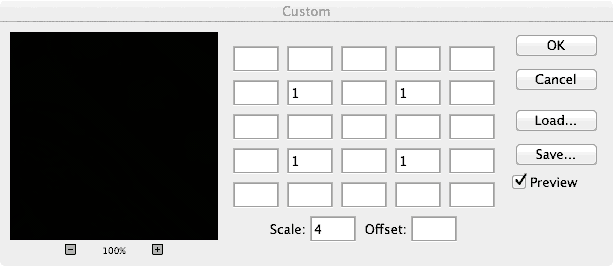
An explanation of the Custom Filter function can be found here.
We will now create a complex layered file, with a layer for each of our eight color estimates. The key to using this — since Custom Filter changes all pixels — is to use masking to limit our processing to solely red, green, and blue pixels where appropriate.
Here are the layers in the file:
Doing this right requires a bit of patience and diligence. I named the layers to help do this more accurately. All of these layers, at first, are simply duplicates of our color mosaic image. The top layer is the color mosaic array, created using custom patterns — we will use this to create our masks.
The next layer — Green on Red - 3x3 edges — is processed like this:
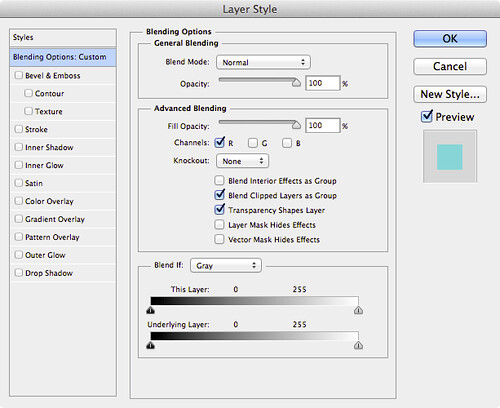
- We are estimating green color values for our red pixels; using the Layer Style (the box is opened by double-clicking the layer) we restrict this layer to only the green channel — G is selected in the Layer Style box.
- Likewise, for all the rest of the layers, we restrict the color channel to whatever color is being estimated: B for Blue on Red, G, for Green on Blue, etc.
- The masks, however, correspond to the color in the mosaic. For Green on Red, we are restricting processing to only the red pixels, giving them a green value in addition to red.
- The CFA layer is useful for creating these masks; for example, for the Green on Red layer, I used Image->Apply Image, selecting the Red channel of the CFA layer, applying it to the layer mask. This gives us a mask where only the red matrix colors are visible.
- If you zoom way into the image, so far nothing has changed; but the custom filter will alter the image. I used the custom filter indicated by the layer name. For the Green on Red layer, I used the 3x3 edges filter — which averages the four green pixels found on the edges of the red pixels, and then assigns that average to the green channel of the red pixel. These custom filters can be found here.
- The two green pixels are handled separately. What I do is use the Red or Blue channel from the CFA layer as a mask, and then shift it by one pixel according to the location, using Filter->Other->Offset; and I set it to Wrap Around.
Once all the layers are set up, we have a nicely demosaiced image:

You can download the 16-bit file here. A version of the file, with all of the layers, can be found here; beware, however, it is over half a gigabyte in size.
Looking more closely:
It appears that the demosaicing process was pretty clean; there might be some color fringing here, but I think most of it is chromatic aberration from the optics.
The next process is removing this color cast by doing a white balance. However, just because we are logically doing demosaicing first, this does not mean that this is optimal for getting good image quality — perhaps we might want to do white balance before demosaicing.
Obviously, it is a bit silly doing demosaicing in Photoshop — but it does work in this case — although a general-purpose programming language would be better.
Other articles in the series are:
Cook Your Own Raw Files, Part 1: Introduction
Cook Your Own Raw Files, Part 2: Some Notes on the Sensor and Demosaicing
1 comment:
Post a Comment