- lens aperture size,
- the time the shutter is open, and
- the light sensitivity of the sensor or film;
This one number, if it is not in a narrow range suitable for the subject, will produce a completely unacceptable image. For example, here are two photographs of my cat Shilo:
![Portrait of a Cat I (Shilo) [EV=-4.5]](http://farm2.static.flickr.com/1282/4685475360_e89a7ba31e.jpg)
Portrait of a Cat I (Shilo) [EV=-4.5]
![Portrait of a Cat II (Shilo) [EV=21.3]](http://farm5.static.flickr.com/4071/4685475510_b367890581.jpg)
Portrait of a Cat II (Shilo) [EV=21.3]
While these might be interesting exercises in conceptual art, they certainly fail as photographs of my cat. For this subject the valid E.V. would be somewhere around 5. Click here to see how exposure value is calculated.
A suitable exposure value for a particular subject must be within a particular range, and although this range may conceivably be quite large, depending on the intent of the photographer, it is certainly not infinite, as the images above show.
Overexposure gives white, underexposure gives black, and shades of gray and color comes from correct exposure, which is somewhere in-between. But we have a problem, and that is color. A digital camera does not capture a single image, but rather captures three: one image each for red, green, and blue colored light, which combine together to make full color. Each of these channels has its own range of desirable exposure values, and these ranges will likely not be equal. The camera gives us one E.V., while we really need one for each channel, and so we have three opportunities for overexposure, and not one.
These three color channels can only reduce the acceptable range of exposure values, as we can see here in this particular example:
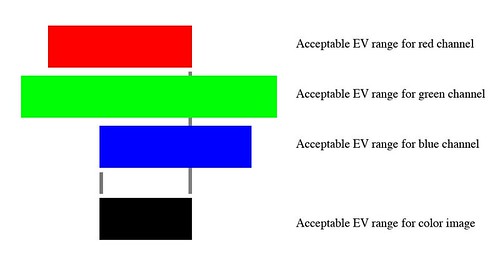
Practically speaking, this phenomena is the reason why color photography is often benefitted by flat lighting, and also why monochrome images can capture more tonal depth with beautifully deep, detailed shadows.
When a digital camera captures a JPEG format image, every resultant image pixel is made up of three numbers; one for each of the colors of red, green, and blue, and these numbers range from 0 to 255. Disregarding digital noise, if a certain minimum amount of light fails to reach a particular pixel, the resultant value is 0, and if more than a certain maximum amount of light hits it, we get 255. As we increase exposure on a colorful object, one of the channels will eventually reach 255 before the others, and this overexposure will cause a color shift.
Here is an example of a sky blue color, simulating an increase in exposure:
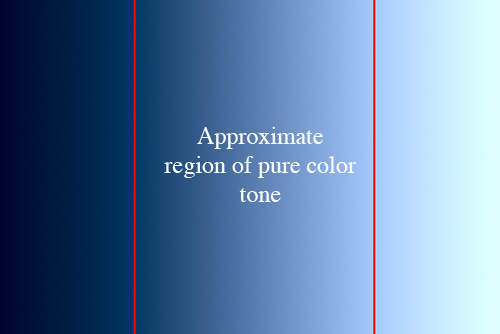
The color noticeably shifts in hue, showing how the acceptable range of exposure values is greatly reduced if we want to capture accurate color.
For a real-world example, see these two photos which have slightly different exposures:
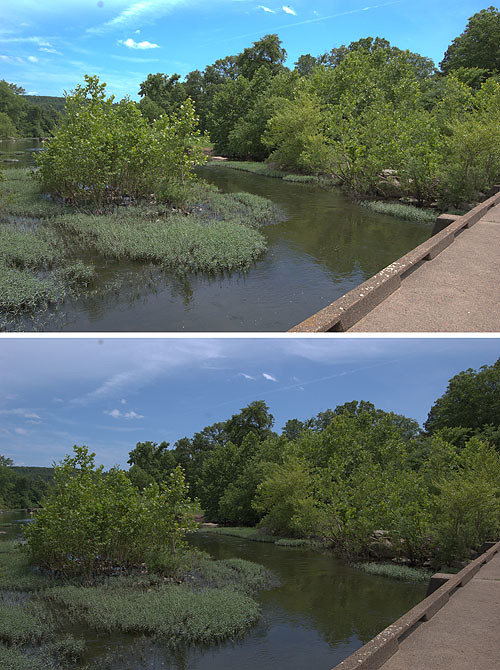
In the first exposure, the blue channel in the sky area is largely at 255, indicating overexposure; the color is obviously wrong since it is an unnatural cyan. The second picture has a good sky color because the blue channel falls below 255 and so retains its proper proportion with the other colors. Note that the green and brown hues of both photos appear to be identical despite different luminance. Generally, if large areas of any one channel is at 255, there is a likelihood of color shifts and loss of detail. Because of this, overexposure ought to be avoided by examining the three color histograms found on many cameras. Reducing exposure like this may make an image relatively dark, but there is typically a lot of detail in the shadows which can be made visible in post-processing.
A photographer needs to determine which areas of a scene contain significant detail, and expose and later post-process the image accordingly. In our example photos above, the blue sky is significant detail and ought to be exposed properly. Usually, out of focus backgrounds and specular highlights can be overexposed without problem, but these often require post processing to remove the strong colors that come from the color shifts described here.
Ultimately, good exposure may not be possible, for the range of detail that must be captured is beyond the range of the camera's sensor; in these cases, supplemental lighting or the High Dynamic Range technique are needed, to either reduce the range of the subject, or to capture the entire range of the subject.
By the way, here is Shilo, well-exposed:
![Portrait of a Cat III (Shilo) [EV=5.7]](http://farm5.static.flickr.com/4016/4688869522_348b58acff.jpg)
1 comment:
Excellent explanation! A good reason to use RAW mode, if your camera supports it.
Post a Comment