Have you ever hit ‘pause’ on a DVD or video tape, and have you noticed how bad the image on your screen looks? Really, even decent quality video looks rather poor in image quality when still. It looks fuzzy. Beginner photographers can take better still images than even big-budget Hollywood filmmakers.
But Hollywood doesn't normally do fantastic image quality because it doesn't have to. This is due to a phenomenon called motion sharpening. Moving images look sharper that static ones. Once a video is playing, perceived image quality goes up tremendously. The same thing occurs when we look at moving objects around us.
This seems rather paradoxical, when you consider that the human eye has a latency which is roughly equivalent to a camera shutter speed of not much more than 1/10th of a second. We would expect moving things to look blurry. But the visual mechanism of motion sharpening makes up a bit for this slow “shutter speed.” Or perhaps our eyes have motion sharpening because of this inherent latency.
This isn't a well-understood process. In fact, if you do a Google search of motion sharpening, all the top articles listed are fairly recent scientific peer-reviewed articles, hardly suitable for the layman. It is apparent that this field of study is fairly recent and not settled. Even though we don't understand this, it is a fact that the human eye adds the impression of sharpness to moving objects. Very likely this is what was happening when I was looking at the candle flame: the black halo around the flame was a sharpening artifact of my eyes, which made the flame more visually prominent, more sharp.
But if we look at an object that isn't moving, then we can expect that it will not be sharp. That is very bad news for photographers. Because we produce static images, we don't get the great sharpening advantage found by cinematographers or videographers, or even the advantage of what we see in real life, when things are moving around us. We are stuck with the job of producing relatively small images, which will be inherently soft — and not sharp — in visual quality.
An image without any contrast will be all one uniform tone, and so contrast is by definition what makes a photographic image. No contrast, no image. Sharpness is an example of contrast on a local scale within an image: lots of contrast near edges make them look sharp.
There are many sharpness woes for the digital photographer related to lack of contrast. I mentioned the static quality of photographs, and here are others:
- The restricted contrast range of printed images. For black and white photography, you might have a 100:1 contrast range for even nice glossy prints. Compare this to the enormous contrast range found out in the real world. Ordinary computer monitors also have a rather limited contrast range.
- The limited degrees of contrast that can be mathematically represented by JPEG, the most common image format. With only 8 bits per color channel, you really can't subdivide the range of contrasts too much and you always risk banding in the final image.
- Small image sensors typically produce inferior images, often due to the poor resolving power of the tiny lenses found in those cameras. Rule number one for getting sharper images is using a larger sensor. But if you have too large of a sensor, you may have depth-of-field problems; stopping down the aperture to get decent range of focus may lead to diffraction, which introduces softness.
- You can't get enough sharpness if you don't have enough megapixels — a low megapixel camera can only be enlarged so much before you no longer see crisp detail.
- You can't get enough sharpness if you have too many megapixels for the size of your sensor. First, your lens may not resolve sharply enough to actually use those pixels effectively; and second, tiny pixels produce noise. Lack of sharpness from inferior cameras is often evident even when a small image is presented on a computer screen.
- Aggressive noise reduction found in some consumer grade digital cameras typically soften the image by decreasing detail in the image.
- The ‘grain structure’ of digital photographs is markedly different from what we find in film. Pixels are typically square in shape, while film grain is rather pointy. The sharp edges of film grain can give a photograph the impression of overall sharpness, and this is lacking in digital technology.
- Many types of image manipulation introduce softness, in particular image rotation, lens distortion correction, and any type of shear and perspective correction. This is ultimately a mathematical problem, and there are improved techniques that can partially correct for this.
- Downsizing an image will tend to make it look soft. There are many algorithms for recalculating an image upon resize, and some do a better job than others, while others produce an artificial oversharpening. The algorithms found in Photoshop CS5 are rather limited.
- Digital cameras have an anti-alias filter which intentionally adds softness to an image in order to avoid a specific kind of digital artifact. Pro-level cameras typically have a weaker filter than inexpensive consumer cameras, and medium format sensors have none. More megapixels help reduce this problem, but this may lead to more noise.
- Unless you use short shutter speeds, or have a very sturdy tripod, images will likely be blurred — less sharp — due to camera motion. This kind of blur will ruin the images of even the highest quality cameras and optics, and is only partially correctable by anti-vibration technology.
Photographers have the problem of producing an image that looks sharp, in a medium that is inherently low-contrast — unsharp.
Would a relentless purist image, taken with superb optics, high-end sensor, and impeccable shooting technique be sharp without any artificial processing? Sadly, the answer is likely NO; better, but perhaps still a bit soft, or at least open to improvement. As my initial experience with the candle flame shows, there is a sort of sharpening that occurs in the eye around moving objects, and pure digital images lack this kind of sharpening.
As it happens, digital cameras add artificial sharpening to images. They have to, otherwise their images would look soft. Better digital cameras let you adjust the amount of artificial sharpening, or turn it off altogether if you want to do your own sharpening during post-processing.
Sharpening is just one end of a wide range of techniques for adjusting local contrast in an image. Sharpening adjusts the contrast of edges, while closely related techniques adjust the contrast over larger parts of the image, like the shadows. Sharpening is a fine art, with many subtleties, and as mentioned, the natural mechanism is not well understood.
So I will whet your appetite with the most basic sharpening tool in Photoshop, Unsharp Mask, which gives us a measure of control over the sharpening process, and which can be used as a basis for more subtle and powerful techniques. That a sharpening tool is called Unsharp Mask is curious, but that will have to wait for another day. Let's just say that blurriness can lead to sharpness.
The problem with technology in generally is that we are often presented with a tool, yet with no real knowledge on how to use it; Unsharp Mask is no exception.
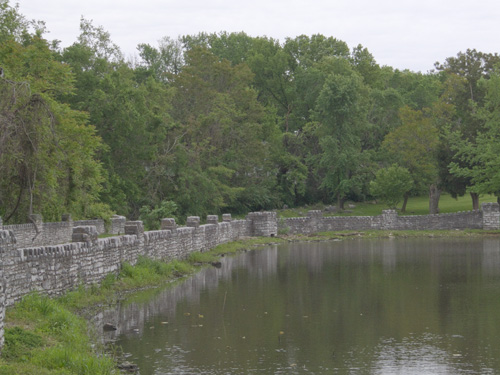
Here is an unremarkable photo, taken with a low-quality digital camera with no in-camera sharpening applied, and reduced in size using Photoshop's Bicubic algorithm, which is known to soften images:
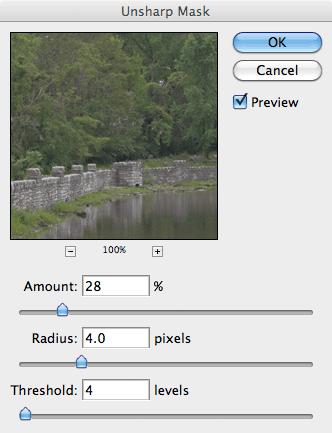
I open Unsharp Mask, and am presented with three parameters:
Now what? Too often, Photoshops' own documentation just lists features, and so do many Photoshop books. These usually don't say how a tool ought to be used. Too many beginners seek formulae instead of understanding, and ask “what settings should I use?” rather than “how and when should I use this?”
OK, I am only interested in final sharpening, which should be done after resizing your image to its final size. As I mentioned, there are lots of sharpening-like methods we can do to increase local contrast, but here I am interested in making the smallest edges more prominent: this is the kind of sharpening done in-camera, and is the roughly the kind of sharpening done by the eye around moving objects.
There are three parameters here:
Would a relentless purist image, taken with superb optics, high-end sensor, and impeccable shooting technique be sharp without any artificial processing? Sadly, the answer is likely NO; better, but perhaps still a bit soft, or at least open to improvement. As my initial experience with the candle flame shows, there is a sort of sharpening that occurs in the eye around moving objects, and pure digital images lack this kind of sharpening.
As it happens, digital cameras add artificial sharpening to images. They have to, otherwise their images would look soft. Better digital cameras let you adjust the amount of artificial sharpening, or turn it off altogether if you want to do your own sharpening during post-processing.
Sharpening is just one end of a wide range of techniques for adjusting local contrast in an image. Sharpening adjusts the contrast of edges, while closely related techniques adjust the contrast over larger parts of the image, like the shadows. Sharpening is a fine art, with many subtleties, and as mentioned, the natural mechanism is not well understood.
So I will whet your appetite with the most basic sharpening tool in Photoshop, Unsharp Mask, which gives us a measure of control over the sharpening process, and which can be used as a basis for more subtle and powerful techniques. That a sharpening tool is called Unsharp Mask is curious, but that will have to wait for another day. Let's just say that blurriness can lead to sharpness.
The problem with technology in generally is that we are often presented with a tool, yet with no real knowledge on how to use it; Unsharp Mask is no exception.
Here is an unremarkable photo, taken with a low-quality digital camera with no in-camera sharpening applied, and reduced in size using Photoshop's Bicubic algorithm, which is known to soften images:
I open Unsharp Mask, and am presented with three parameters:
Now what? Too often, Photoshops' own documentation just lists features, and so do many Photoshop books. These usually don't say how a tool ought to be used. Too many beginners seek formulae instead of understanding, and ask “what settings should I use?” rather than “how and when should I use this?”
OK, I am only interested in final sharpening, which should be done after resizing your image to its final size. As I mentioned, there are lots of sharpening-like methods we can do to increase local contrast, but here I am interested in making the smallest edges more prominent: this is the kind of sharpening done in-camera, and is the roughly the kind of sharpening done by the eye around moving objects.
There are three parameters here:
- Amount: how much sharpening is applied. 0% is no sharpening at all, 500% is lots.
- Radius: the distance over which sharpening is applied. This can vary from fine edges to broad areas.
- Threshold: this limits the effect to only more prominent edges, and is used to prevent enhancing noise.

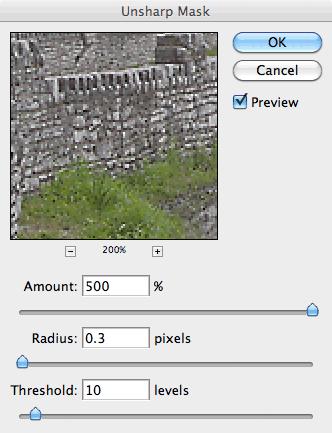
The noise is enhanced, and we need to reduce this problem. Raise the Threshold slider until the noise is not sharpened all that much:

We have a trade-off here. If we don't want to sharpen any noise whatsoever, then we will do no sharpening. But if we have to set the Threshold slider above, say, 25, then the image is likely too noisy to sharpen. It is a poor image and needs other work before sharpening. Here I got rid of a lot of the noise, but not all of it.
Ok, now click on a part of your image that has good, in-focus detail; this will sharpen the best. I usually zoom in to 200% on Unsharp Mask's preview. Move the slider to a Radius of 0.1 and move it slowly higher; keep an eye on the edges.
There will be a point where the detail will visually ‘pop’; this is the point where Unsharp Mask overcomes the inherent digital softness of the image, and it will likely vary between images. This is a step, which for best work, ought to be done on an image-by-image basis. For me it is a Radius of 0.3:
Now reduce the Amount until the image still looks sharp, but does not have obvious artifacts. The sharpness should be almost unconscious.

This was sharpened to 423% and may be a bit over done, but this is representative of the kind of crude in-camera sharpening done by many inexpensive compact cameras. This method does increase the sharpness of edges, making them more distinct. This isn't great, and could be better, but it is a start.
No comments:
Post a Comment