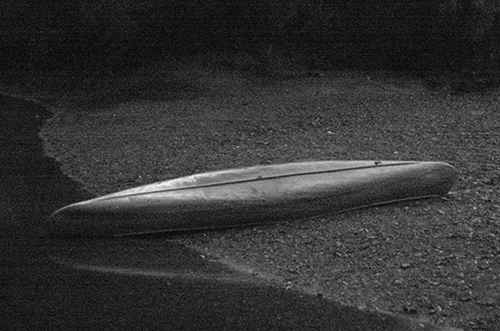
But consider this photograph of a canoe, taken about 45 minutes after sunset, on a moonless, starless night, illumined by the waning skylight, distant fireworks and lightning, and a lone incandescent lamp a hundred or more yards away:
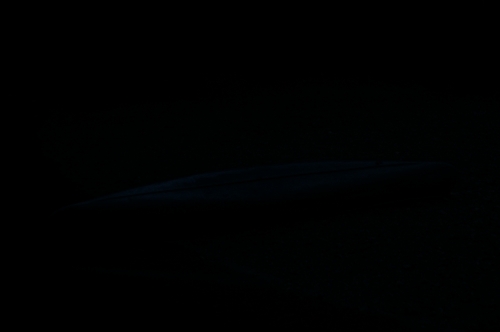
This was an interesting scene to my eyes, but there isn’t much to see in my image — just a very faint outline of an object. You might have better luck seeing something if you click the photo twice to see it in Flickr with a dark gray background.
I took this with my camera mounted on a tripod, but because I could hardly focus at all, I set the aperture to f/8 for greater depth of field, and I didn’t use a long exposure time because I didn’t want to spend 2 hours getting my photo — one hour, perhaps, for the exposure, and one hour for dark frame subtraction. Sometimes it is inconvenient or even impossible to get a good exposure, so you have to make do with what you can get. I wanted to see how good of an image I could get at the limit of the camera’s performance.
Here is Photoshop’s histogram of the image:
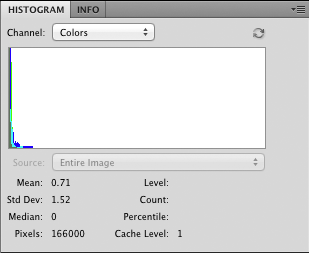
Numbers of dark pixels are shown on the left hand side of the histogram, and where there any bright pixels, they would be shown in the right hand side. The heights of the colored patches show us the relative number of pixels of any given brightness, taking into account the color. We see a big spike on the left hand side of the chart, which tells us that most of the image is black. No surprise. The histogram shows that some blue, cyan, and green pixels are somewhat brighter than black, and if you examine the image of the canoe closely, you can see a faint area of brighter tones.
By using the Levels tool in Photoshop, I was able to brighten the image:
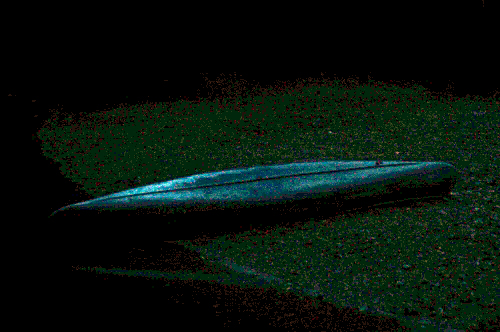
We can now see the subject fairly clearly.
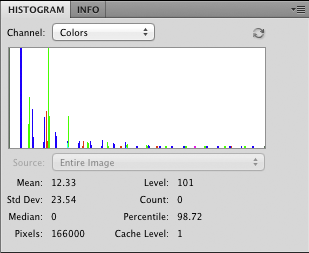
I brightened each channel individually so that the histogram goes all the way across, just touching 255 on the right:
The image is particularly rough, and about 66% of all the pixels are pure black. Note the gaps between the colors on the histogram: this evidences itself in the photo by noise and a distinct lack of color range. Whereas the light from the sky was bluish, as seen on the canoe, it is sitting on a gravel bar, which was reddish, and not green at all.
I shot this at my camera’s base ISO, and used the camera’s dark frame subtraction feature to minimize noise, but we have very little data to get a good image. But, even with severe underexposure, we still can get some image, even if it is inferior.
In my experience, a large percentage of digital images are rather deficit in shadow detail — certainly mine are — and so can benefit from some shadow-brightening, either in post processing, or in-camera, by using features such as Nikon’s Active D-Lighting.
The first JPEG image above was processed from the original RAW file using the original camera settings:
- White balance = Auto (Because whatever white balance was here was not particularly obvious.)
- Tone compensation = −2 (Leading to less contrast and better conservation of highlight and shadow detail.)
- Saturation = 0 (Lowering digital noise as well as conserving highlight and shadow detail.)
- ISO sensitivity = 200 (Base sensitivity of my sensor, for less noise. This may not be needed, as we shall see later.)
- Color mode = Ia (sRGB color space, the standard used by most digital cameras, printers, and the Internet.)
Please consider the following steps that most digital cameras do when converting their original RAW sensor data to a JPEG image:
White balance — that is, adjusting the image so that neutral objects appear neutral in the JPEG image — is done by multiplying the red and blue color channels by some value that depends of the color of light falling on the scene. While this is a necessary step under most conditions, this increases noise in an image, since the red and blue values are amplified by the multiplication. Under one particular daylight lighting condition, my camera will multiply the red sensor values by 2.11 and the blue values by 1.52, while the green values remain unchanged. Under the incandescent lighting in my office, the blue channel is multipled 4.4 times. Image files generally only use values from 0 to 255 for each color channels, so any intermediate values get rounded off, leading to more noise. Also, large values will get cut off if they exceed 255, which can lead to color shifts in highlights.
See these articles for more information:
White Balance, Part 1
White Balance, Part 2: The Gray World Assumption and the Retinex Theory
Color space conversion — digital camera sensors don’t perceive colors as does the typical human eye, and so a conversion takes place within the camera to approximate human vision. Under the simplest method, a linear mathematical combination of the values from the sensor is used to approximate human color perception. More precisely, the color is converted to a standard color space such as sRGB, which typically is a subset of humanly visible colors. For my camera, the DxOMark website states that this formula is used:
sRGB red value = 1.64 x RAW red − 0.61 x RAW green − 0.02 x RAW bluePlease note that we have negative values here, and that negatives aren’t allowed for sRGB color numbers, and so there are plenty of plausible colors captured by the camera which get set to zero in our final JPEG image, and so we will lose detail. All of this multiplication will increase noise, and don’t forget that the white balance function increases noise also. By the way, the negative numbers found here indicate that the range of colors that can be perceived by the camera exceeds the range of colors that can be represented by the sRGB color standard.
sRGB green value = −0.11 x RAW red + 1.45 x RAW green - 0.35 x RAW blue
sRGB blue value = 0.03 x RAW red - 0.34 x RAW green + 1.32 x RAW blue
See this article for more information:
Examples of Color Mixing
Gamma correction is used to reassign the color tones in the image so that more values are assigned to the dark and mid tones, making the storage, display, and editing of the image more practical and convenient, as well as being a bit more in-line with human perception of relative tones. For example, a medium gray tone, something that we’d call 50% gray, actually only reflects about 12%-18% of the light falling on it. A linear image, without Gamma correction, would not allocate much data to the critical important dark and mid-tones, and so we would likely show banding in the shadows and dark colors.
Gamma correction is calculated by using exponentials:
Gamma corrected red value = (sensor red value)(1/Gamma correction) with the same being done for the other color channels.The signal is normalized so that the value read from the sensor is divided by the maximum possible sensor value, so that the numbers here go from 0 to 1. Whenever we take an exponential of either 0 or 1, we get the same number back, and so only the mid tones are adjusted. Typically, the gamma correction value used is 2.2, which may not be perfectly in harmony with human vision, but it is good enough for most photographic work. Please note that many cameras will handle values close to zero in a somewhat different manner, but for the purposes of this discussion, the exponential component is what is important.
If a particular pixel in a RAW image reads at 22% of its maximum value, then the gamma corrected value will be .22(1/2.2) = .50; so we can see clearly that mid tones get pushed higher in value. An sRGB value of (128,128,128) which appears to the eye to be close to a medium gray tone, and which is about half of the maximum value available in sRGB — which is (255,255,255) for pure white — represents a much lower reflectance in real life than its middle values indicate.
ISO sensitivity adjustment amplifies the signal coming from the sensor, giving us the option of trading off a shorter exposure time (or greater depth of field) with increased digital noise. Now, if you are going to produce a nicely exposed full-tone image in-camera, and you want great technical image quality, then by all means use the camera’s base ISO setting. But if you are doing what I’m doing here — severely underexposing an image just so that you can get something quickly — then using a high ISO may not increase noise at all.
I have to boost the brightness of my sample image in post-processing, which is a process that increases noise. As we saw with the adjusted image above, we can brighten it but be left with a very poor image, with lots of blotches of color and with most of the image being pure black. If instead I used the same shutter speed and aperture, but boosted the ISO from 200 to 1600, I would have gotten a JPEG that would have had much more detail. Boosting ISO increases noise, but as far as I know, all cameras generate less noise with their electronic ISO adjustment than we can obtain when brightening an 8-bit JPEG image. The general rule is that if you are otherwise going to brighten an image after the fact in post processing, then by all means use the highest natural ISO that the camera can offer to get the image as close as possible to the brightness you need it to be, if you can’t brighten the image otherwise with longer shutter speeds or wider apertures.
Saturation and contrast adjustments are other things done in-camera in order to produce a pleasing JPEG output. Saturation increases the vibrance of the colors, while contrast adjustment will compress the highlights and shadows to produce more distinct mid tones. Both of these techniques emphasize some details while eliminating others, and generally produce images that have less information content than an unprocessed image.
Noise reduction is something else that digital cameras typically do with images — this process can be severe or non-existent, or selectable by a menu. Clearly, noise reduction usually destroys detail, but it can be necessary to produce an image that is tolerable. Dark frame subtraction is a kind of noise reduction that does not destroy much valid detail, but instead removes systematic or patterned noise generated by the sensor, especially during long exposures. The camera, after taking an exposure, will close the shutter and then take another exposure for the same length of time but without light falling on the sensor: this ‘dark frame’ exposure is then subtracted from the digital image, subtracting out this patterned noise. I recommend doing this if your camera supports it; the major problem is that it doubles your total exposure time.
Many of the features explained above will harm an image taken at a camera’s limits of sensitivity. For this reason, by shooting RAW, my camera produces a file without most of these adjustments. Now, Nikon’s View NX2 or Capture NX2 software will do this processing after the fact, and Adobe Camera RAW and other software packages do similar processing. But for my purpose of squeezing the most possible out of a severely underexposed image, I will use Raw Photo Processor (RPP), a Mac-only RAW converter that gives me far more control over the processing.
Using RPP, I process the image in a minimalistic way:

Click the image to see it in a larger size.
The critical settings here override many of the standard image processes found in digital cameras:
- UniWB gives us the color channels unmodified for white balance. This shows us the native white balance of the camera.
- Raw RGB TIFF 32-bit does not convert the image to any color space, but simply gives us the RAW channels. This software also gives us the ability to use 16 bits, but I find it insufficient to squeeze out all of the image data. Certainly 8 bits would not suffice to give us good total detail.
- Gamma 1.0 overrides the gamma correction function. Since I’m brightening the image, gamma correction ought to come after the brightening: doing so beforehand will alter the tonality of the image.

Not too bad, especially considering the earlier job of brightening that I did before. This is not white balanced, and as mentioned, the RAW processor did not convert the camera’s color space to approximate human vision. 22.5% of the pixels are black, but at least my main subject — the canoe — is clearly visible, showing that we managed to squeeze a few more bits of data from the camera.
This is a noisy image, as we should expect, but we ought to be able to get a fairly clean monochrome image out of this. If we examine the three color channels, we can see that some are noisier than others:
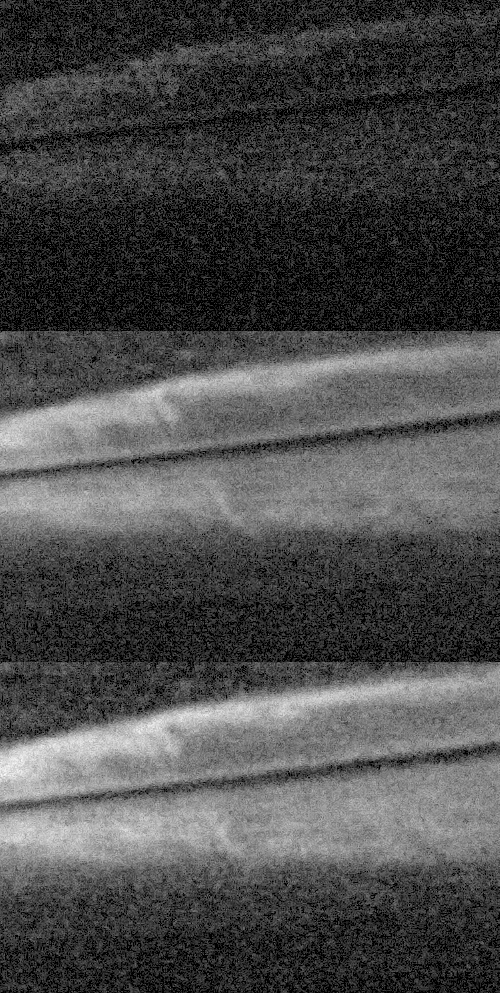
From top to bottom, we see the same patch of the canoe, at 100% magnification, for the red, green, and blue channels. Clearly the red channel is noisier than the other two, and if we do a white balance on this gray colored canoe, the red channel would have to be amplified greatly, increasing noise greatly. The green and blue channels seem to be close in the amount of noise.
For a monochrome version of this photograph, I’d discard the red channel, and mix together the green and blue:
This image is still noisy, but who would have ever expected that we could get a photograph this good from an image that was underexposed by 6 and 2/3rds stops?
Now, I’d like to get a color image. This is problematic because of the extreme noise found in the red color channel, and none of my noise reduction methods was able to reduce to something tractable — the noise was highly speckled, and using an adequately large radius of blurring on that channel to remove the speckle caused lots of color bleed from the gravel to the boat.
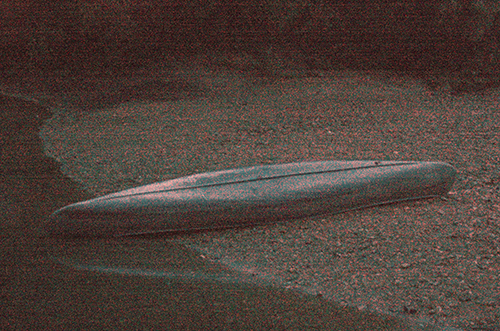
Much of the noise we have is from the red channel, so we should expect color shifts between red and its opponent color cyan, as we see in this image.
Now, I know that the canoe is gray, while the gravel is reddish brown, and so I constructed a plausible red channel from the blue and green channels, and I made it a bit brighter so as to bring out the red of the gravel. I did severe noise reduction on these colors, and then I adjusted the white balance so that canoe is neutral in color. As a general rule of thumb, in a white balanced image, the red channel will be the lightest in overall tonality, while the blue channel will be the darkest, so this observation can be used to good effect when doing channel replacement.
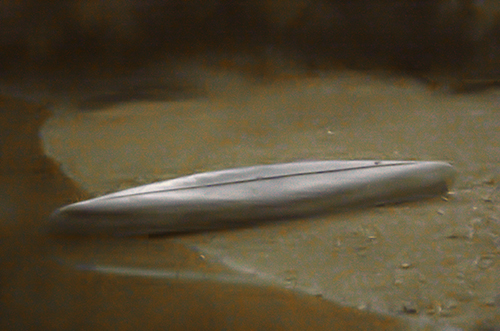
Luminance is more important than color, and so even though this color image is very blurred and rough, it is adequate in its color content. Putting this image as a layer on top of the good monochrome image, and setting the blending mode to ‘color,’ I was able to produce a plausibly colored image.

This is not too bad, considering that the image started out looking like this:

No comments:
Post a Comment